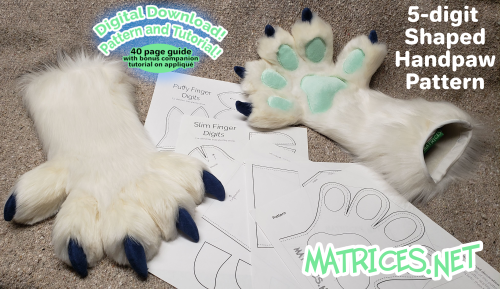
I am extremely proud to present my trusted handpaw pattern that I developed over the years – which now you can make too!!
This has spent a long time in development and has been a major goal of mine to write and share the content in this guide. 40 pages & 90+ pictures! PLUS a companion tutorial on applique is included too! Its a big milestone for me to have accomplished such a detailed tutorial and share a cherished design of mine with all the crafters out there.
This guide has been carefully written with a ton of step-by-step photos so everyone can learn how to make a detailed, comfortably fitted, cute, and dexterous set of 5-digit handpaws with shaped fingers.
For more tutorials on crafting fursuits, check out my website, Matrices.net!
I had someone message me on Instagram politely asking why fursuits cost what they do. I had a little time tonight to delve into specifics to help enlighten them and others who have asked this same question.
EXAMPLE SCENARIO: A full fursuit that costs $4500 from a professional maker. This isn’t even considered all that high a price today but it’s a fairly average price for us currently, so we’ll use that as an example.
- MATERIALS: 6 yds fur: $125 - 230 half roll 1/2” foam: $15 half roll 1” foam: $15 half roll blue foam: $6 spray glue: $12 plasti-dip: $14 minky/vinyl/fleece fat quarters: $15 glue sticks: $7 2 spools thread: $7 pens, pencils, pins, chalk, etc: $5 2 rolls masking tape: $4 tagboard for drafting patterns: $2 thrift store sheets for testing patterns: $10 polyfil: $10 eye plastic, buckram, paints, zippers, misc: 30 spandex and other lining fabrics: 17 shipping box, tape, packing materials: $8 __________ MATERIALS -$300 - $405
-Payment Fees Every electronic payment service will charge fees for using them- the fees are fairly comparable between Paypal, Square, and Stripe. Mailed payments are possible for less or no fees, but you can’t beat the convenience of electronic payments.
PP FEES ON 4500: -$130
- TAXES: Self employed people have to set aside around 20% of all their earnings for taxes. So 20% of 4500 is $900. Tax refund?? Don’t know her!
- ACTUAL PAY? So $4500 fursuit minus cost of materials, taxes, and fees actually equals around $3100 in pay. And this is assuming no mistakes are made during fursuit construction that require more materials to be purchased, your equipment doesn’t need maintenance, and you don’t need any special materials not listed above. Also, I estimated the fur price based on a $21-35/yd, but faux fur can cost $65 a yard and higher depending on what it is.
OTHER PRICING FACTORS:
- SUPPLY/DEMAND: Anyone in the market for a fursuit has undoubtedly noticed that virtually every full time maker usually has a full queue and opens for commissions infrequently. When a popular maker opens, they usually get to pick and choose what projects they want to take on and inevitably have to turn down some applicants. Despite there being more and more professional fursuit builders out there taking commissions, demand for fursuits continues to rise, and there’s still not enough makers to fill the demand. It is a seller’s market- we are able to raise prices yearly and demand does not waver. It’s anyone’s guess when/where we’ll find the ceiling on this market.
- NICHE GOODS: Fursuits are super niche market and only a relative few of us can 1. produce professional quality costumes 2. successfully run a home business and stay on top of deadlines, finances, customer service, etc So if professional fursuit builders are a rare breed, those who are reliable and timely are basically a unicorn. Niche markets for luxury items equals luxury prices.
- TIME TAKEN TO CREATE: Fursuits are a lot of work! There’s no getting around it. Even those of us who have been doing this a long time can take between 75-150 hours to create a typical fullsuit on average, and this doesn’t include all the other work like research, brainstorming, emails, social media, web shop maintenance, and packing + shipping.
- EXPERTISE: If you’ve been working at the same job for years, you can expect to make more money than someone just starting. The same is true for fursuit builders! We deserve raises as cost of living increases yearly and as we get better at our jobs. So it is not uncommon at all to see fursuit builders gradually increasing their prices year by year.
- NO JOB BENEFITS: Working for yourself is rewarding but also expensive. If you’re doing this full time and don’t have anyone else supporting you, you have to provide your own healthcare and make sure you have extra money saved for sick time, vacation days, all the stuff traditionally employed people don’t have to think about.
It is easy to be dazzled by the prices professional fursuit builders are charging and imagine we must be loaded, but all in all it is quite a modest lifestyle. Those makers who haven’t gotten fast/confident at building and don’t have a huge fan following may really genuinely struggle in the beginning (which is why I wouldn’t recommend just diving on into professional fursuit building without a plan or fallback). The most successful of us are still definitely not rich. We budget for the things we want and we need and have to weigh carefully any trips or luxuries, just like anyone.
Professionally made fursuits are not affordable to all, it’s true- that’s actually why I started making fursuits, I wanted one but couldn’t afford it. I still can’t justify spending the money to have someone custom create something for me, my lifestyle just doesn’t support that kind of luxury spending.
I was actually really reluctant to DIY my first fursuit it in the beginning, I had no experience with sewing or fabrics at all and had to learn everything from basics. I strongly recommend anyone interested in fursuits try making their own at least once- worst case scenario you waste a few materials and figure out you don’t enjoy it, best case scenario it ignites a hidden artistic passion within you like it did me! DIY can be a wonderful solution for those who want a fursuit but can’t afford a commission.
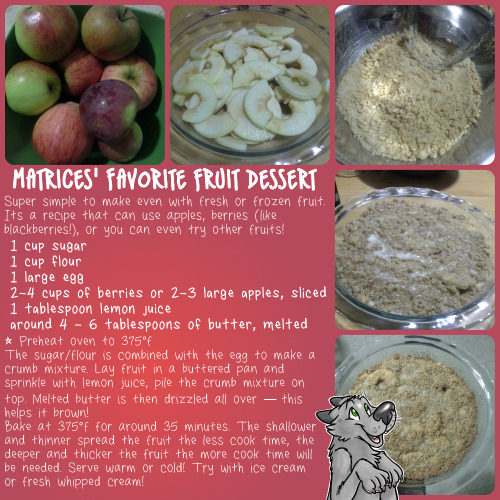
Its about time I share my favorite fruit dessert recipe with you all. Super duper simple, you can do a lot of variations to make it with different fruit or even add bonus flavors like cinnamon and nutmeg for apples, or change its texture by swapping out the flour for bisquick. If you want more sticking power for your crumbs, you can also try a 2nd egg in the recipe.
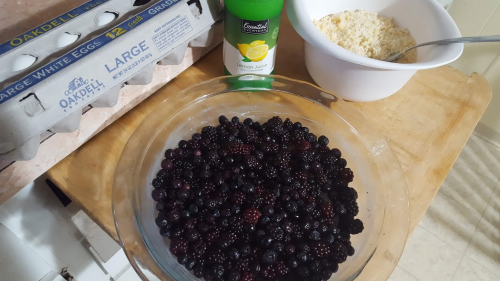
I make this all the time with whatever’s fresh in proportions that I have on hand (sometimes in cartoonishly small portions, its very easy to make this recipe small for one, or make it big for many people – or to last one person a few days… >_>) my all time favorite combo is with fresh picked blackberries or raspberries, but for the above version I used apples, and in the step-by-step photos below, I used a mix of blackberries I picked myself and frozen store-bought blueberries.
The Recipe
1 cup sugar
1 cup flour
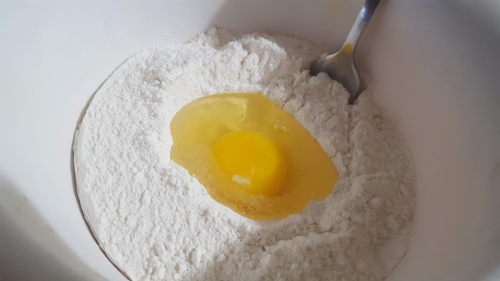
1 large egg
2-4 cups of berries, or 2-3 large apples sliced (you can even try other fruits!)
1 tablespoon lemon juice
around 4-6 tablespoons of butter, melted
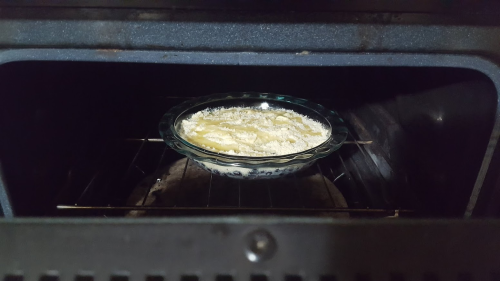
Preheat the oven to 375 degrees fahrenheit.
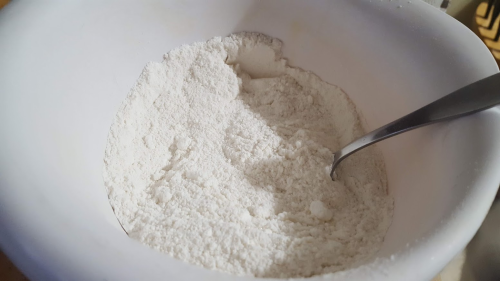
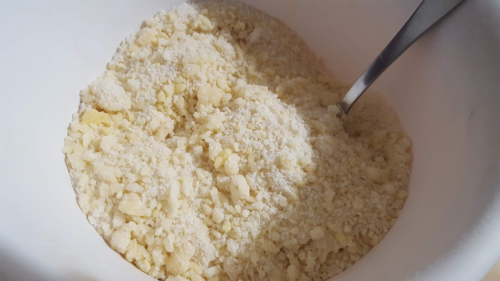
The sugar and flour is stirred together, then combined with the egg to make the crumb mixture. It will be fairly dry.
Butter your pan that you plan to cook in, and lay the fruit of your choice in the pan so it covers the bottom. Sprinkle the lemon juice on top.
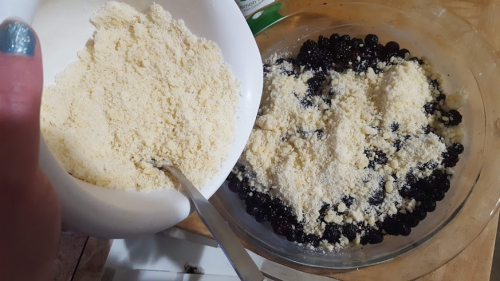
Pile the crumb mixture on the top of your fruit. If there is extra, spread it to the sides of your pan but do not mix it in.
Drizzle the melted butter fairly evenly all over the top, this will help it brown!
Bake it at 375
ºF for around 35 minutes. The shallower and thinner spread your fruit, the less cook time, closer to 35 minutes. The deeper and thicker the fruit and the pan you use, the more cook time will be needed.
It is ready when the crumb mixture gets toasty brown and the fruit filling starts to bubble up the edges and through the top.
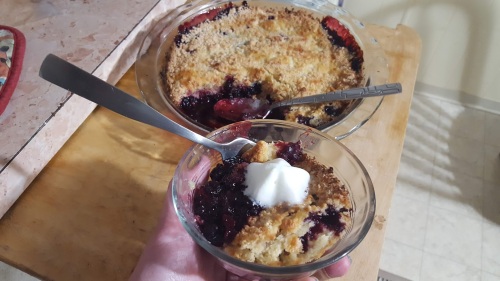
Serve warm or cold! Try it on its own, or with ice cream or fresh whipped cream!
Photo Steps
Stir together 1 cup sugar 1 cup flour.
Add 1 large egg.
Stir it together until it resembles crumbs. It will be fairly dry like this.
Butter the sides and bottom of your pan. Then add the fruit of your choosing so it covers the bottom. Sprinkle 1 tablespoon lemon juice over the fruit.
Pile the crumb mixture on top of your fruit.
Spread any excess to the sides of the pan (but do not mix it in).
Drizzle the melted butter on the top fairly evenly. Its ok if it doesn’t cover everything. This helps your crumb mixture brown (and lends yummy buttery taste of course)!
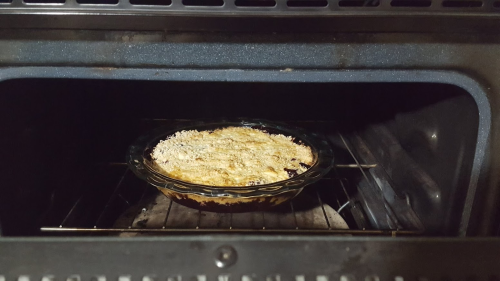
Place it in the center of the preheated oven for around 35 minutes. The shallower and thinner spread your fruit, the less cook time, closer to 35 minutes. The deeper and thicker the fruit and the pan you use, the more cook time will be needed.
This is about the look you are after!
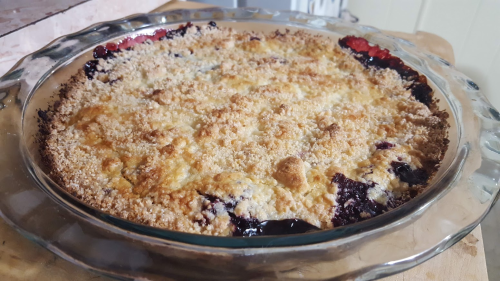
Here’s the finished dessert! Allow it to cool a bit before digging in, but it is super delicious served warm! And just as good served cooled completely, too!
It is slightly messy, so serve it in a bowl. Add ice cream or whipped cream if you like!!
Big Update to this fun recipe, now with step-by-step photos. This is still my favorite fruit dessert!!!
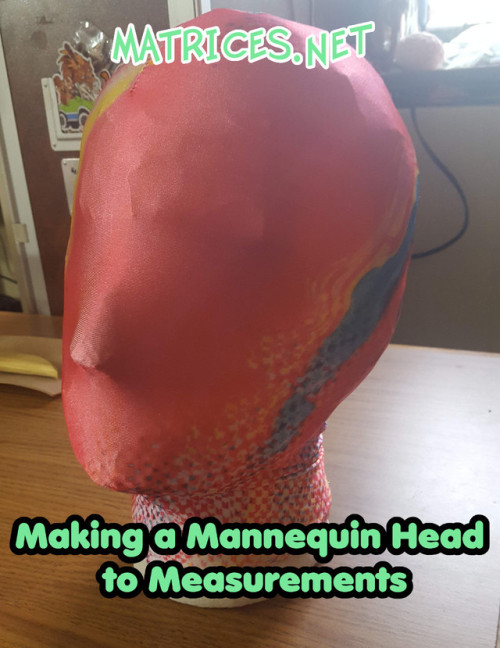
Making a Mannequin Head to Measurements
This is a tutorial designed to show how to make use of a cheap styrofoam wig head and transform it into something truly useful by using inexpensive materials.
The goal is to create a head mannequin that better matches measurements of your (or a client’s) head. It is highly useful for creating a halloween costume, cosplay, or even fursuit heads!
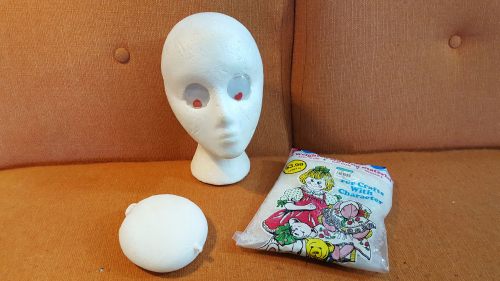
Styrofoam wig heads themselves are much too small to use for creating a costume head alone. They often match only the smallest wearer as-is. The majority of people will absolutely need to pad out the styrofoam wig head to accurately match their own head’s dimensions. Due to how cheap and common wig heads are, they’re a fine place to begin for creating a head that DOES fit!
Be resourceful in finding your supplies to make this, it can be done very cheaply. Many materials I used in the creation of this tutorial are scraps or things purchased from a thrift store, including the wig head itself. I have provided link URLs to show simply as examples.
Materials
• Styrofoam wig head • Weight (such as polyester pellets for dolls, BBs, wood board, etc) • Scissors and/or Razor knife • Measuring tape • Hot glue • Tape (duct tape or masking tape) • Padding (scrap foam, quilt batting, newspaper, fabric etc)
Optional
• Needle & thread or sewing machine to sew a cover. • Scrap stretchy fabric for a cover.
Making a fursuit body isn’t as hard as it might seem! With these
tips you will be able to make a perfectly fitted fursuit body! When
it comes to bodysuits it really helps to have a sewing machine as
part of this process, while it is possible to entirely hand-sew a
body – using a sewing machine will save you an immense amount of
time! Faux fur is very forgiving, and some traditional sewing
techniques you may have in your background just don’t work on things
like fursuit zippers. Let’s get started and learn about the wonderful
craft of making a fursuit body!
Materials:
Sewing
machine
Regular Polyester Thread
Muslin
fabric or flat sheets up-cycled from a thrift store.
Long
Pins and/or clips
Safety-pins
Soft
measuring tape
Straight
edge
Seam ripper
Chalk (or something to mark
your fur fabric with) and a Permanent Marker
Scissors
Snap-off extendable razor
blade
Faux fur in the colors and
lengths of your choice.
This tutorial got an update!!! With 9 new step-by-step images and a bunch more text to help you learn how to start building your fursuit body and fit it to yourself using a jumpsuit pattern and fabric to test fit it!
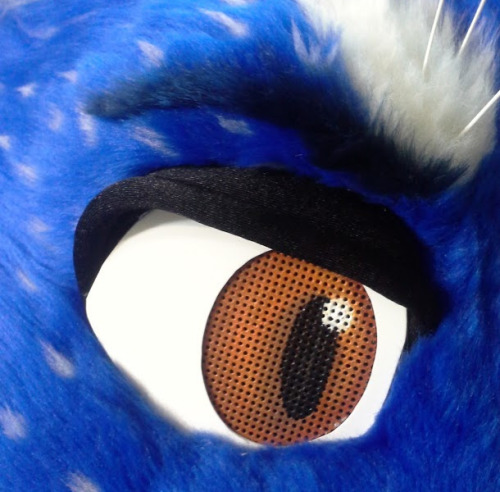
Upcycling is also known as “creative re-use” and it is a concept I like to incorporate a lot in my costumes and a concept worth sharing with others! This tutorial will cover how to make eyes for a fursuit by being resourceful with available materials to create cartoony eyes for your mask. This technique yields eyes with good visibility that also help with ventilation.
Materials
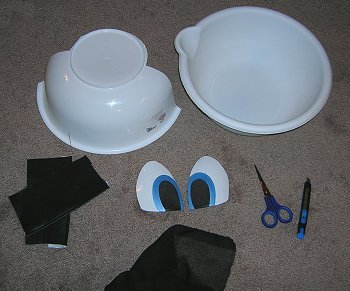
One large plastic bowl.
If you can’t find bowls, you can substitute empty detergent bottles (such as bleach or laundry soap), cutting boards, plastic bins, etc. If it is plastic and the right size, you can use it!!
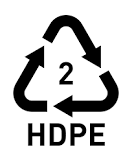
Look for HDPE recyclable label, it can help you narrow things down!
Scissors.
Razor knife.
Mesh for your eyes
Acrylic paint and sponge to apply the iris color. (And/or paint pens, brushes, etc.)
Here are some examples of upcycled materials, like the plastic bowls used. Vinyl for dimensional eyelids, and an example of cartoony eyes that will be shown in this tutorial alongside other works in progress.
What Plastics to Look For
This tutorial is all about being resourceful! Upcycling objects that could work takes a bit of guessing, but you can narrow it down by searching for the recyclable logo for HDPE. It is often labeled with the above logo in North America. HDPE stands for “High Density Polyethylene”
In this guide I recommend seeking out plastic bowls. They are perfect for the gradual convex shape that cartoony character eyes have. If you can’t find bowls, you can substitute empty detergent bottles (such as bleach or laundry soap), flexible cutting boards, plastic bins, etc. If it is plastic and the right size, you can use it!!
Try to avoid plastics that are too thick or are brittle. If you can flex the plastic with your hands and it doesn’t crack, then its useful for this task. Most HDPE can be cut with scissors!
If want to buy new rather than upcycling, you have a Tap Plastics store around, they sell HDPE in many colors! Including white, yellow, light blue, black, etc! They come in large plastic sheets for under $10. This will last many many projects if you buy an entire sheet of it. Some locations have scraps you can purchase, or they may have cutting services available as well. If you just want a small piece, re-sellers are listed on my Fursuit & Crafting Resources page.
HDPE is used in so many common household plastic products that I definitely recommend trying to upcycle first before buying new.
Updated and almost completely re-written, the tutorial on Making Toony Eyes now has a focus on using upcycled materials, and has DOZENS of new photos and an absolute ton of new text on everything I know on the topic!
This guide has been updated a few times over the years, but this time I hope it is the most informative version!! The summer of updates continues with Making Toony Eyes getting the biggest update so far!
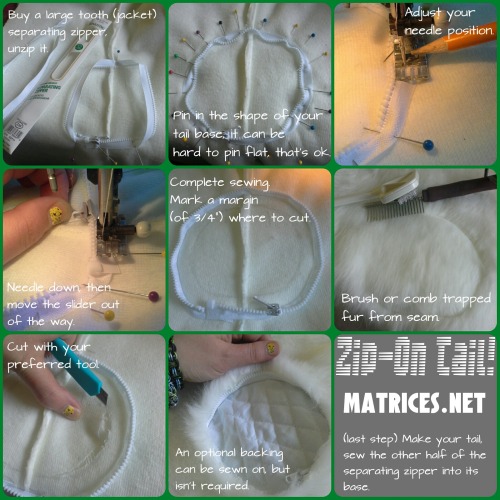
A tutorial for skilled tailors. This guide teaches you how to create a zip-on tail so you can have a beautiful smooth transition between bodysuit and tail that is still removable for washing or storage!
There’s a few requirements to make this addition to your project easier to construct: This should be done before you make your tail, so your tail can be made to the size of the zipper. The zipper slider planned and oriented to match the body so your tail aligns correct. Also this should be done before you sew the front half of your body to the back half!
The summer of updates continues – This 5-year-old tutorial got a HUGE update!
It now features individual images, with expanded text descriptions below each image and even more tips and informative text to help you through making your own zip-on tail step-by-step!
Hand sewing
Hand Sewing for Beginners!
Do you ever want to know where to start with learning how to sew? I’ve got you covered! I have tried to break it down into easy steps for you to accomplish the task! After that its just repetition and practice! This simple guide shows step-by-step the following foundations to hand sewing:
How to thread a needle.
Tying an overhand knot.
Knotting your beginning stitch.
And tying off a knot after your ending stitch.
I’ll cover hand stitches in another guide that I will link within this tutorial when it is ready. For now, if you find this in a reblog, find the newest version of the tutorial at this link:
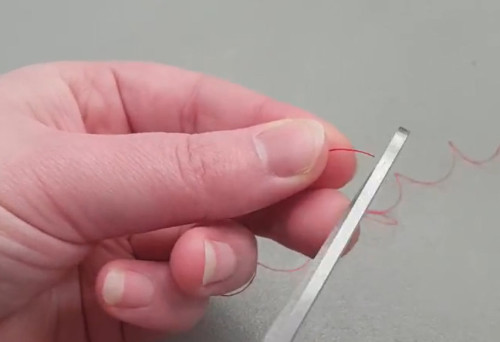
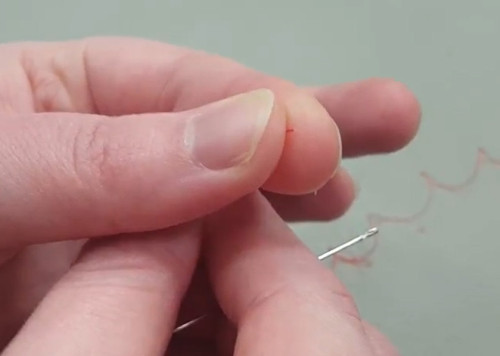
You want a nice fresh edge on your thread. Take sharp scissors and cut off any frayed edge.
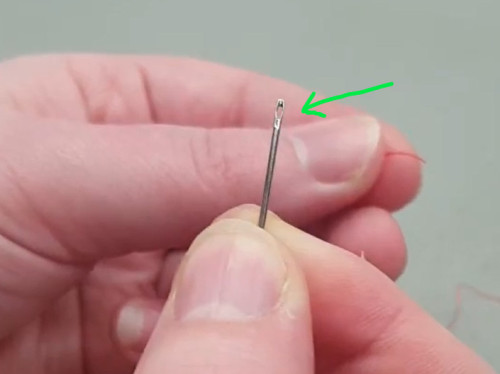
The “eye” of the needle is the hole in the top of it where thread passes through. You want sewing needles with a fairly big eye, this just make life easier for you if they are like that. Use what you have if they don’t have that feature.
Hold the thread between your fingers, and then pull any excess down into your fingertips. Squeeze your fingertips together to allow just the very tip of the thread to poke out between your fingers,
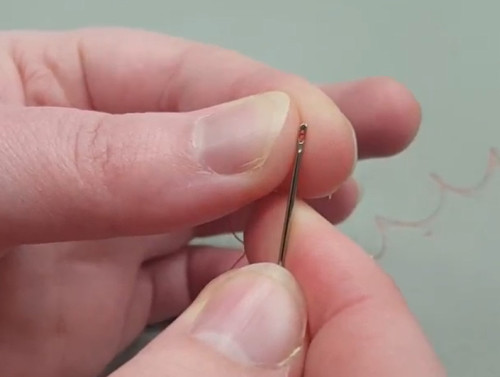
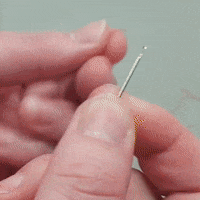
Rotate the eye of your needle so it can land directly on the thread. You are making a valley with your fingertips that will align your needle and eye right on top of the thread.
Then rock your fingers upwards to push the thread through the eye of the needle!
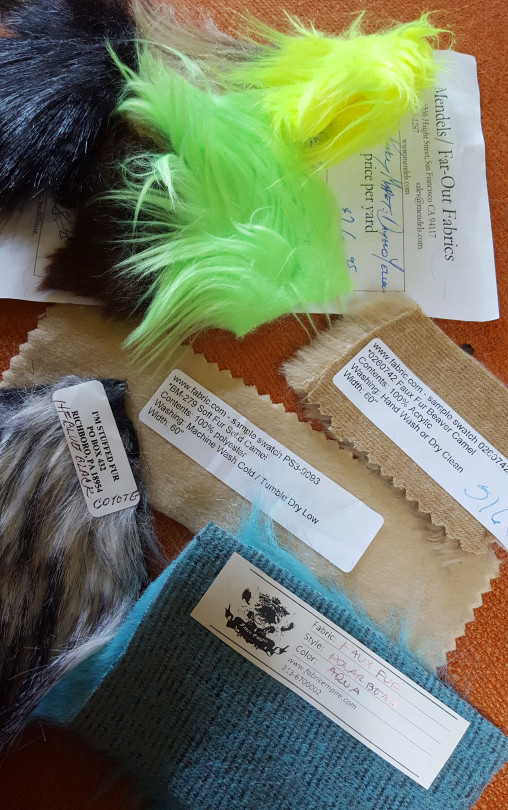
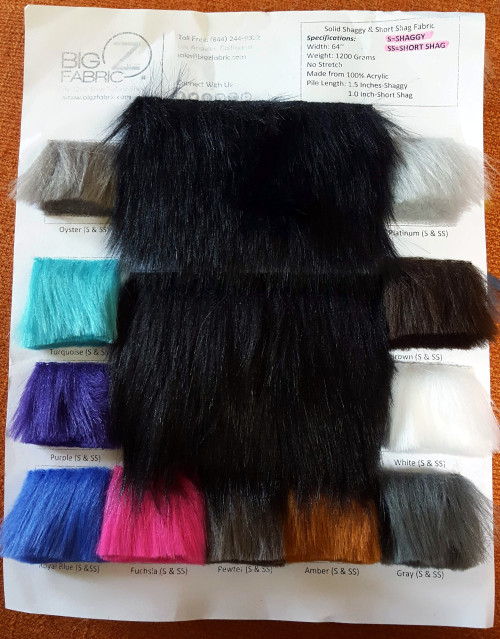
What to look for when buying swatches and choosing fur.
There are lots of great resources to buy fur available online! It can be difficult to hunt fabric stores for faux fur, especially outside of fall/halloween/winter seasons. So online shopping is a way to build fursuit and costumes with fur any time of the year!
The trick to it is buying a swatch first so you know what you are getting! A swatch is a small sample of the fur fabric that the company selling the fabric will mail to you for a small fee. Swatches are usually around $1 - $5 each, don’t skimp on the swatches! For each color you plan, its smart to get a few swatches to compare. They are invaluable in terms of knowing what the color looks like in different lighting conditions, how it feels, how it moves, and how it shaves. Asking other artists opinions just isn’t the same!
Most Online fabric stores make it obvious how to get their samples, but some less-so. You may need to use their search, or simply ask!
Some sites have swatch collections you can purchase as well, such as Big Z, it offers “color cards” which includes all the colors that type of fabric comes in!
If you are collecting samples offline (from a physical fabric store) the store might not allow swatches to be cut and you may need to buy an entire strip of the minimum cut of that fabric. Ask what the smallest amount to be cut is, it might be a few inches! Your swatch will be a strip instead, but you can cut it to a manageable size later and share the extra swatches with friends.
How do I examine a swatch?
When you buy fur, its not about “the softest” – it is literally what works best with the project you are creating. And everyone’s projects are different with different goals!
Some furs are sparse and flowy with mesh backings and those are incredibly awesome for all over a body/chest to help the wearer stay cool, while they are totally terrible for shaving. Others may be extremely thick and plush, but awful for wearing because of how heavy they are. Some feel “crispy” in your hand, but have a realistic look and are extremely durable and will look good for a long time. Some are different textures, but they are the colors you need.
Its all a careful balance of the search for the texture you want, or the color match you are after. For sure the fursuit maker’s struggle.
I like to mix textures and fur lengths because it adds interest to a costume’s design. Once I receive an order of swatches in, I examine them, take them into the sunlight and indoors light. I also match them up with existing swatches in my collection. As well as see how stretchy they are or aren’t. Then I break out my electric shaver, and see how it shaves. Sometimes it reveals a different colored undercoat, a spotted or patterned backing, or a sparse arrangement of fur, those aren’t ideal for shaving unless it works with your particular project. Definitely use a slicker brush on the shaved and unshaved portions to make sure the fur stays in the backing under normal maintenance.
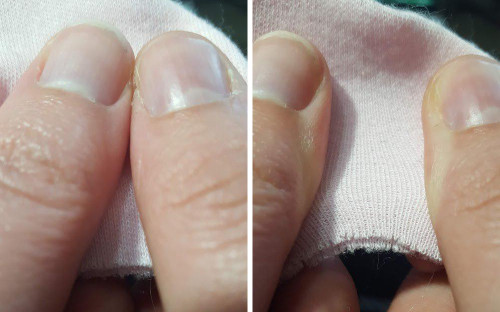
Determine how much stretch the fabric swatch has. This will tell you if you need to make a dart or if it will fill out on its own just by being stuffed or stretched into shape over foam. Hold a swatch of fabric you plan to use like on the Left, it can be at any angle that would match your project you are patterning. Make sure the fabric is relaxed.
Now pinch it between your fingers and stretch it apart, like on the Right. That measurement between your two fingers is the amount of stretch your fabric does or doesn’t have.
The distance you can measure is how much leeway you have to stretch your pattern to fit. If your swatch doesn’t stretch at all, or doesn’t have a stretch from the angle you are planning to put it at, you can then add a dart to your pattern.
Regarding backings, some are stretchy, some are not. Some have a smooth texture, some are different than others, and that is all completely OK. You are going to want to be wearing underarmor or athletic underclothes while wearing fullbody fur costumes like fursuits anyways, so if a backing is “scratchy” that doesn’t make that fur un-useful in any given project.
You will find a lot of the common furs made by a manufacturer called “Shannon Fabrics” they distribute it to all of the resellers. A lot of those furs are the same colors and textures, but sold under different color and texture names. Its up to the individual website on how they brand and sell them. For example “Luxury Shag” and “Punky Muppet” are the same thing.
When you are ready to buy, measure your patterns so you know how much you need. It is very easy to be tempted to overbuy, and I try to discourage it because it can be difficult to store and re-sell fur remnants. (Photographing, measuring, pricing and listing. Taking payment, then boxing and mailing. Its a very involved process) You may still end up with a bit extra (for repairs or mistakes) because online fabric stores often sell in whole or half yard increments only.More information on “How much fur do I need?” here!
Here is a summary of what you can do with a swatch of faux fur:
Think about your project goals. Is your project based in natural colors or fantasy colors? What works best for the project you are creating?
Take it into the sun and indoors to see it in different lighting conditions.
Match them against other swatches you have to compare texture, density, or length.
Check stretch (this can immensely help you when plan darts in your pattern)
Check what it looks like trimmed or shaved.
Use a slicker brush and brush it to see if it stays under normal maintenance.
See if it unravels or runs easily when you pick at the edges.
Shake it! See how that fur moves and lays.
Test it! Cut that swatch in half and use one part of it for a washing test or other test! Keep half as a “control” and test the other half!
How should I label my swatches?
When your samples arrive, they often come with the invoice that tells you what you ordered. But it is extremely easy for this invoice to get tossed or separated and the swatches kept instead, that info now lost. So labeling your swatches clearly and as soon as you get them becomes more important than ever. Here are ways you can label your swatches and information to include.
Label the month and the year you acquired it “July 2019″ – this is important!! As dye lots can and will change over time, knowing what time period your fabric’s dye lot was created from can help. If your swatch is more than a year old, you want to know so you can get a new swatch in case the color changed!
Label the color and type that it was named where you ordered it. Examples “Mint Rabbit” “White Arctic fox” “Emerald Long Ecoshag”
Label the website name it came from. Examples “Imstuffedfur” “Mendels” “Big Z”
Label the project or character’s name you plan to use it with or have used it on in the past. This is optional, but can help sometimes it’s easier to remember “Matrices Grey” or “Bonk Mint.” Naming by project sticks more strongly in memory, especially when you come back to use that fur, or think about that swatch again!
When it comes to actually sticking a label on your swatches, you can do so by writing on the swatch in pen, stapling a small paper label to your swatch with this info, or writing it on a label sticker and sticking it to the backing!
How should I store or organize my swatches?
Storing swatches can sometimes be an afterthought. But if you plan on making lots of projects with fur, storing and organizing swatches becomes more important as more of them are collected.
Here’s some creative ideas and solutions that are useful, especially if you are low on space but want to stay organized.
Attach them to cardstock with staples or double-sided tape.
Use a binder with plastic sleeve inserts to tuck them in so they can be put away on a shelf.
Use a cork board and pin them up on the board so they can be stored hanging up.
Put a small hole in each swatch, and use a metal ring or carabiner to string them together so they can be stored in a drawer or hanging up.
Clip them together with clothespins to hang them up.
Have fun with collecting, examining, and organizing swatches for your projects! Hope this helps! Happy crafting!
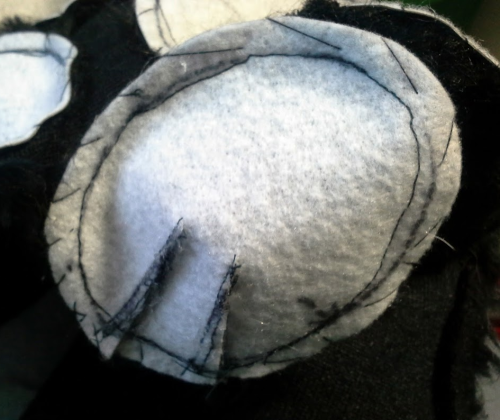
For some curved seams basting instead of pinning can really speed up the machine sewing process!
Pinning along curves tends to be easy to fumble, poke you, or be so closely spaced there are a tons of pins to hold everything down. And it can simply add an extra layer of challenge to sewing with a sewing machine. Basting is a pretty good alternative solution for paw pads, fingertips, curves, or anything with a tight angle to it where pins are clunky and get in the way!
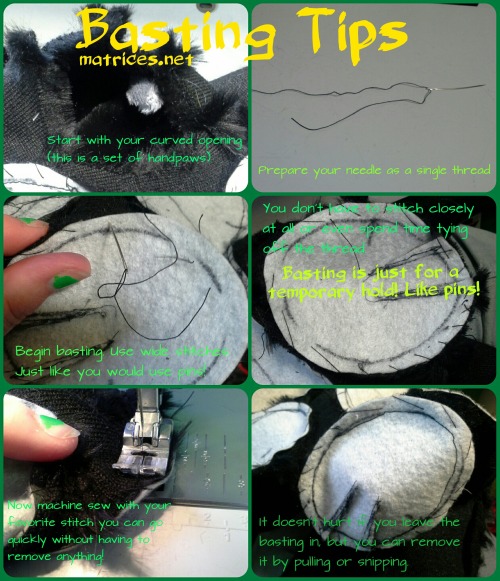
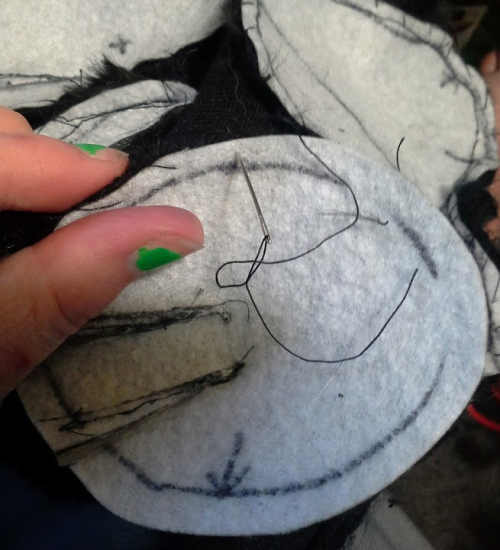
Start with your curved opening.
The above is an opening for a paw pad on a shaped set of handpaws. It is a curve that goes around where the pad gets sewn in, but also up along the paw’s digit.
Cut out the part of your pattern that will be basted in. This can be any other material, including fur. If your pattern has darts (the wedge-shaped triangles on the right of the pattern) sew those together before you baste your pieces.
Prepare your needle as a single thread – don’t tie it off!
Begin basting by using wide looping stitches. Space them like you would pins!
It doesn’t have to look pretty, its just temporary to hold the complex shape in place! Temporarily, just like pins!
You don’t even have to stitch closely at all, or even spend time tying off that thread (it will be easier to remove if you do not tie anything off when doing this)
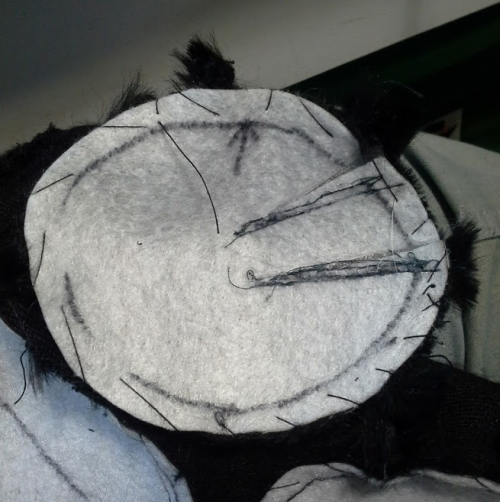
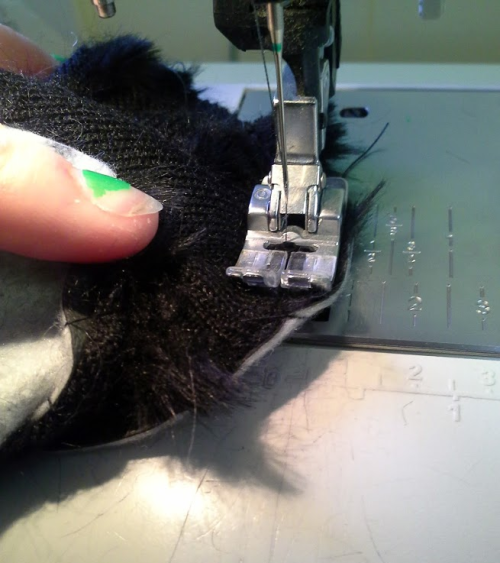
Sew your basted pattern pieces with a sewing machine. No pins to get in the way! You can use your favorite stitch to sew your fabric pieces together.
You can go quickly without having to pause to remove anything! Basting makes your project easier to handle and manipulate without getting poked.
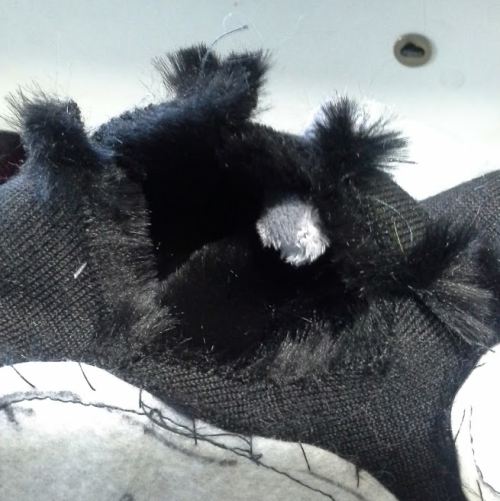
Here is the sewn paw pad. It does not hurt to leave the basting in place. (This will save you time! Especially if it is going to be hidden by stuffing). But you can easily remove the temporary basting stitching by pulling on the thread or snipping it away.
Hope this saves you some time sewing! Happy crafting!
This four-year-old tutorial got a much needed update. Larger photos, expanded text explaining the concept, and it was broken out of the hard to read single-image format. Enjoy!!
Welcome! I am Matrices: Dog-person extraordinaire. I enjoy drawing, building costumes, making props, and generally being crafty. I live on the North End of Whidbey Island, in Washington State.